
From AI to Art: How I Built a Personalized Valentine’s Day Card Express Your Love
Express Your Love Without Buying A Gift in the Year of Snake and DeepSeek


I was scrolling mindlessly on the Internet, looking for men’s perfume, a deluxe afternoon tea gift voucher, or a weekend getaway.
In a world where price tags measure love, I wondered if there was a unique way to express my gratitude without buying gifts.
Yes, there is!
Please pick up your crayons, brushes, or python( it’s the Year of Snake anyway)!
In this article, I will share how I created a personalized Valentine’s Day card using deep learning and NLP and give honest feedback on using DeepSeek during this project. If you want to turn data into art, this article is for you.
Table of Contents:
Where Is Your Face? The Old-School vs Modern Detective
Bring Your Favourite Impressionist Art To Live
Get Inspired by AI to Express Love or Maybe Not
Make Your Ultimate Love Card
Kill Two Birds With One Stone — Design Once, Pass It On
Where Is Your Face? The Old-School vs Modern Detective
Nothing gets more personal than having a Valentine’s Day card with your face on it.
But instead of a paper card, which is always left in my drawer and gathering dust, I want to create a card you can download on your phone and look at the love messages whenever love is in the air!
To get started, I’ve uploaded a picture of my hubby to find his face.
I experimented using models like Haar Cascade and MTCNN (Multi-task Cascaded Convolutional Network), and MTCNN performed much better at detecting faces from pictures.
Like any AI evangelist, I’ve used tools like DeepSeek and ChatGPT to help explain those two concepts.
DeepSeek gives me more academic explanations, using words like “deep learning” and “facial landmark detection.” Its tone and style are more rigid and fact-based.
ChatGPT Plus gives me a more general and creative explanation by analogizing old-school and modern AI detectives for both tools. An analogy that a 10-year-old child can relate to well.
DeepSeek offers more technical depth, while ChatGPT is much better at content generation and engaging with the audience. Both tools help me better explain the concepts, but with very different styles.

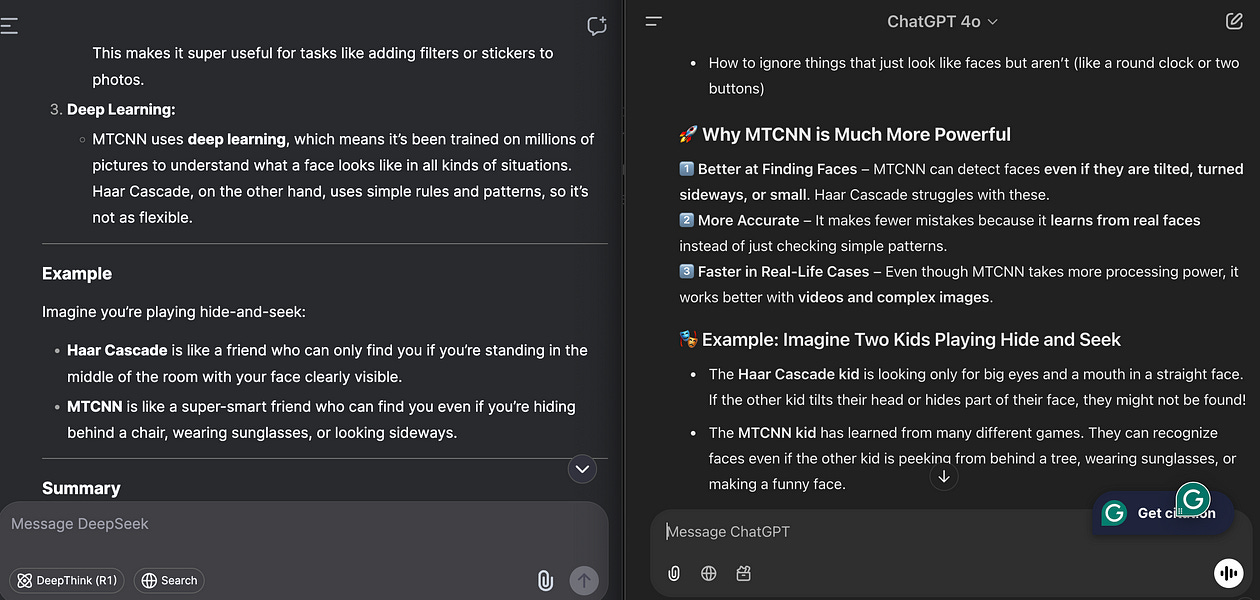
Using ChatGPT’s analogy, the differences between Haar Cascade and MTCNN are:
Haar Cascade is like an old-school detective who focuses on finding patterns in an image — two eyes, one nose, and one mouth. The model cannot detect if the lighting is dark and half the face shows.
MTCNN is like a modern detective with a super AI brain who has seen thousands of faces. It can tell a face from dark lighting or when it is partly hidden and knows that a clock is not a face.
One of MTCNN’s superpowers comes from facial landmark detection- a GPS for the face to tell where the eyes, nose, and mouth are from a picture to know if it is a face.
The image below shows MTCNN correctly identifying five faces in the group photo and highlighting where the face, nose, and mouth are using red lines.

Once we’ve successfully detected a face in a photo, we can detect its emotion using the DeepFace model. It looks at facial expressions to tell if it is a happy, sad, or angry face.
def analyze_mood(image_path):
    # Analyze facial expressions using DeepFace
    result = DeepFace.analyze(img_path=image_path, actions=['emotion'], enforce_detection=False)
    dominant_emotion = result[0]['dominant_emotion']
    print(f"Detected emotion: {dominant_emotion}")
    return dominant_emotion
Bring Your Favourite Impressionist Art To Live
Once I’ve detected the face in my image, it’s time to bring it to life with an artistic touch!
I’ve always been a huge fan of Impressionist art, especially Van Gogh. I love his textural brushstrokes and vibrant colors.
What if we could have our loved one’s photo painted in Van Gogh’s style?
I used the style transfer technique with the VGG19 deep learning model (19 means 19 layers).
Because VGG19 has seen thousands of pictures, when we give a picture to it, it looks at in layers:
The first layer is to find the ‘how,’ such as Van Gogh's paintings' style, color, and brushstrokes.
The deeper layer is to find ‘what’ — objects, i.e., faces in my photo.
We first load the VGG19 model and use its feature part to extract patterns from pictures without training the model:
# Load pre-trained VGG19 model for style transfer
def load_vgg19():
    vgg = models.vgg19(pretrained=True).features
    for param in vgg.parameters():
        param.requires_grad_(False)  # Freeze parameters
    return vgg
We defined the specific layers for style and content and standardized the images in a particular way expected by the VGG19 model:
# Define content and style layers
content_layers = ['14']  # conv3_2
style_layers = ['0', '5', '10','19','28']  # Fewer style layers for balance

# Image transformation pipeline
transform = transforms.Compose([
    transforms.Resize((256, 256)),  # Resize to 256x256
    transforms.ToTensor(),
    transforms.Normalize(mean=[0.485, 0.456, 0.406], std=[0.229, 0.224, 0.225])  # Normalize for VGG19
])
We need to find a balance between the original photo and the stylized photo after the style transfer, which means:
Loss: a way to capture the difference between the actual value and predicted value to measure how well a model is doing
Content loss: we measure the difference between the original photo and the output image of the original photo after applying the styling
Style loss: we compare how the original Van Gogh image differs from the afterward version
In other words, content loss ensures that the person in my picture still looks like my husband, and style loss ensures that it looks like Van Gogh painted it.
We use the Adam optimizer to minimize the total loss (content loss + style loss) to ensure the content image retains most of the content and that the style image adopts the style without distorting the content image.
# Calculate Gram matrix for style loss
def gram_matrix(tensor):
    _, d, h, w = tensor.size()
    tensor = tensor.view(d, h * w)
    gram = torch.mm(tensor, tensor.t())
    return gram / (d * h * w)  # Normalize to prevent huge values

 # Load VGG19 model and move to GPU
 vgg = load_vgg19().to(device)

 # Define the optimizer (changed from LBFGS to Adam for better stability)
 optimizer = optim.Adam([output], lr=0.003)  # Lower learning rate for stability
During the style transfer:
The style loss is decreasing steadily, indicating that the style is applied to the image.
The content loss remains relatively stable, indicating the output image preserves the original content without distorting too much.

There are some artifacts (blue dotted lines) during the style transfer due to the model’s limitations. To fix this, I added some cute elements to it.
The final output looks like this, with swirling cloud formations in Van Gogh’s style.

Get Inspired by AI to Express Love or Maybe Not
The next step is to write a heartfelt message.
Instead of simply saying, “I love you,” AI can inspire us to express love more creatively.
I have experimented with different models, such as GPT-2, GPT-Neo, and T5. The good news is that you can access them via HuggingFace’s free pre-trained model libraries.
Just like how we interact with Chatgpt, we give the model a prompt to ask the model to return a message:
# Create a prompt for GPT-2
    prompt = f"Write a heartfelt Valentine's Day message for {name}, who feels {emotion}. Make it funky and personal!"
As mentioned before, after experimenting with various models, the messages they generated were general and lacked depth on the first attempt.
So, I adjusted the model’s parameters to improve performance — increasing temperature, avoiding repeated phrases,top-k sampling, etc.
# Generate text using GPT-2
    outputs = model.generate(
        inputs,
        attention_mask=attention_mask,  # Pass the attention mask
        max_length=150,  # Limit the length of the message
        num_return_sequences=1,  # Generate only one message
        no_repeat_ngram_size=2,  # Avoid repeating phrases
        top_k=50,  # Limit the vocabulary to the top 50 words
        top_p=0.98,  # Use nucleus sampling for better quality
        temperature=1.2,  # Increase temperature for more creativity
        pad_token_id=tokenizer.eos_token_id# Set pad token ID
    )
I also asked Chatgpt and Deepseek for advice on message optimization. While Chatgpt offers advice such as adjusting parameters values, etc., DeepSeek decided to take a break and wouldn’t respond after multiple attempts:

The main problem I face while using DeepSeek is the constant drop in service; I’ve encountered this error daily. Despite trying 9 times, it wouldn’t respond — the instability does put me.
After several trials with different models to get the most suitable message, I’ve realized I couldn’t get more creative or artistic messages without training those models with a Valentine’s themed data; the best result I can get is like this:

If you are willing to pay for token usage, the better alternative is GPT-3 via the APT token routes. Mind you, they get used up very quickly!
So, instead of outsourcing my love message to AI, I took back control and wrote it myself, using some AI inspiration.
Make Your Ultimate Love Card
It’s time to assemble everything, making the ultimate Valentine’s card.
Just like how we would make a paper card, I did:
Create a blank canvas background in pink (this is the perfect time to go all in for pink)
Resize the stylized image to fit in the card and paste it onto the pink canvas background.
Define what the texts will be by calculating their position and adding the messages.
# Step 1: Load background image
background_color = (255, 182, 193)  # Light pink background (RGB)
background = Image.new('RGB', (800, 1000), background_color)

# Step 2: Load the styled image
styled_image = Image.open('final.jpg')  # The image with the style transfer
styled_image = styled_image.resize((400, 400))  # Resize to fit in the card

# Step 3: Paste the styled image on the background
background.paste(styled_image, (200, 50))  # Positioning the image on the card
And ta-da, here is the result of the final card with love messages.
When I saw the final card, I felt excitement and pride. It wasn’t perfect, but it is a heartfelt creation I know my husband will cherish!

Kill Two Birds With One Stone — Design Once, Pass It On
By turning the whole process into a Streamlit app, I’ve made it easy for anyone to upload their images and create a personalized card for special occasions.
All you have to do is create an app.py file, which includes your main processing steps and the UI elements that you require on your interface:
# Step 1: Set the page configuration
st.set_page_config(page_title="Valentine's Day Card", page_icon="❤️", layout="wide")

# Step 2: Display the Title
st.title("Create Your Personalized Valentine's Day Card ❤️")

# Step 3: Let users upload a background image (optional)
st.sidebar.header("Upload a Custom Background (Optional)")
uploaded_background = st.sidebar.file_uploader("Choose a background image", type=["jpg", "jpeg", "png"])

# Step 4: Let users customize the text message (optional)
st.sidebar.header("Customize Your Message")
message = st.sidebar.text_area("Write your personalized message for the card:")
You will see an interactive interface where you can upload your new image and add new messages to Taiilor on different occasions.

Seal The Card, Sign Off
This Valentine’s, I didn’t just create a personalized love card; I customized an experience using the power of AI. AI's possibilities are endless, from detecting your face and styling your photo with an artistic touch to writing heartfelt messages. With the rise of powerful tools like DeepSeek and ChatGPT, AI has become more accessible than ever.
AI doesn’t have to be just a fun project for Valentine’s Day; it could help you build a deeper connection with your audience, create personalized marketing, and create meaningful customer experiences.
What’s the one AI personalization wonder you want to bring to life?